
Most system issues are caused by missing or damaged OS (Windows 10) files or drivers.
So always make sure that Windows Updates and Drivers are fully up to date
https://www.support.drmem.com/hc/en-gb/articles/360019515638-Software-issues-blue-screens-crashes
However some issues are caused by faulty or slightly loose internal components
See below to check for hardware issues.
***Always switch the PC off at the rear power switch and unplug the power cable, before un/installing internal components/cables ***
Check the internal cables
1. Press the PC power button for 15 seconds, or until the PC goes fully off.
2. Turn off the PSU at the back of the PC (The switch can be found at the bottom of the case where the power lead plugs in).
3. Remove the power lead
4. Make sure the black power cable to the motherboard is fully plugged in and clipped in. A short video explaining connections: https://youtu.be/0QsaQOExrZA
5. Make sure the CPU power cable is fully plugged and clipped in (this can be found on the top left corner of the motherboard. it's a black square cable with four pins. See image).
6. Make sure the CPU fan is fully clipped in and flush with the motherboard.
6. Reinsert power lead & turn PSU back on.
7. Turn the PC back on using the Power button on top or the front of the PC. Just press the button once to turn on no need to hold it down.

Check the CPU Fan
Please check there is no movement in the CPU heatsink & fan assembly it should be properly and firmly held in place at all 4 corner points. See the red boxes below.
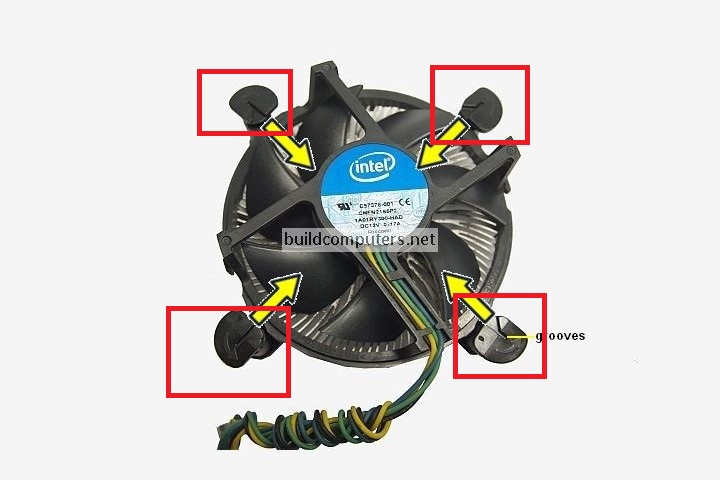
The arrow indicator on the plastic locks should be turned all the way clockwise to lock the CPU cooler down.
If one of these connections feels loose turn the arrow counter clockwise and push the connector down firmly but carefully, until you hear or feel the pin click into place
Then turn the arrow back fully clockwise to lock.
You may need to do the same with the opposite connector to lock both sides firmly in place
Please be careful not to actually remove the fan, we are just checking that it isn't loose.
Check the Graphics Card GPU Power cable
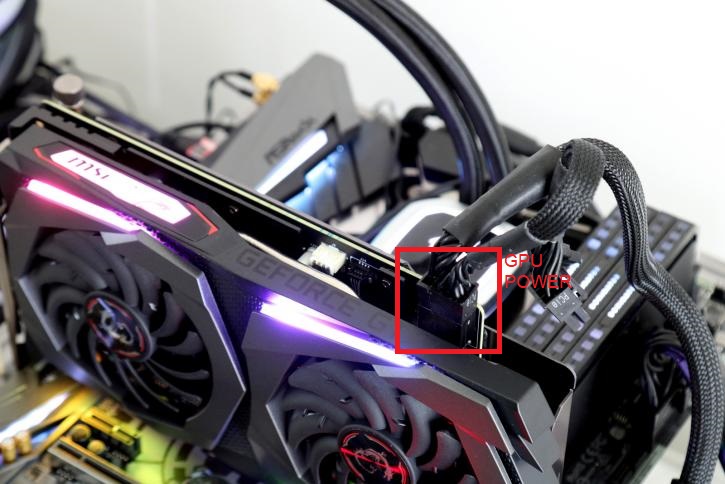
Make sure that the power cable is plugged into the GPU
Sometimes this connection is on the back of our GPU cards and on some models on the top.
Some of our cards do not need additional power so don't have this connection at all.
If this cable is not plugged in or not fully inserted you will get no display at all or intermittent display & stability issues
Check the Memory
Clean both the memory and the slot the memory is installed into.
These steps are not usually because the memory or slot is dirty as such, rather it is to make a good solid connection when reseating the components
1. Shut down the PC using the power button on the top of the PC, hold button for 15 seconds.
2. Turn off the PSU at the back of the PC (a switch can be found at the bottom). Remove power cable.
3. Remove both RAM sticks and clean gold connectors on both rams using alcohol or nail polish remover. And put them back. Make sure the ram makes a click sound when you push each corner in. A short video on how to uninstall and clean the ram: https://youtu.be/0GhxMyPgYOo
While the memory is out of the slot, clean the slot with compressed air, or a fine, clean brush, then blow down the slot to dislodge any dust or debris after brushing. Then reinsert the memory
4. Plug power cable back in & turn PSU back on.
5. Turn the PC back on using the Power button.
6. Test the system
Check the Individual Memory RAM Sticks & Slots
If you still have instability/crashing after reinserting the memory.
We need to test the individual Memory/RAM sticks on their own and the individual DIMM Slots on the motherboard
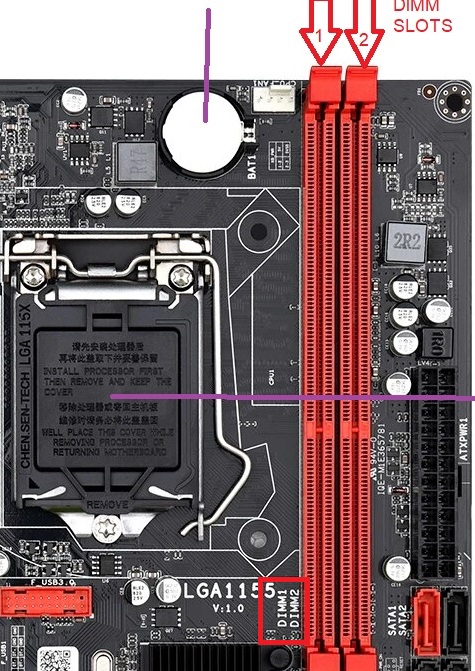
1. Make a mental note of Memory stick 1 & 2
2. Take both RAM sticks out and clean
3. Then put RAM stick 1 in DIMM Slot 2 the memory slot furthest away from the processor fan, with nothing in DIMM Slot 1 the slot closest to the PC Fan
4. If that test is successful, reverse and repeat the steps above and install RAM stick 1 in DIMM Slot 1 the slot closest to the processor fan, with nothing in DIMM Slot 2.
5. Repeat the steps again but this time only using Memory Stick 2
6. Make a note of which stick or slot appears to be faulty
Reseat the Graphics card
Video included for reference purposes. It isn't our video but shows the procedure quite well and clearly
https://www.youtube.com/watch?v=IqnYWsHNGaI
On our cases removal is pretty straight forward
So with the PC switched off and the power lead removed
1. Unclip the power connector
2. Unscrew the screws on the back panel
3. The little plate on the back panel should then just push outwards
4. underneath the graphics card itself there is a small plastic lock holding the card into the motherboard socket itself
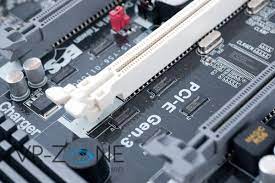
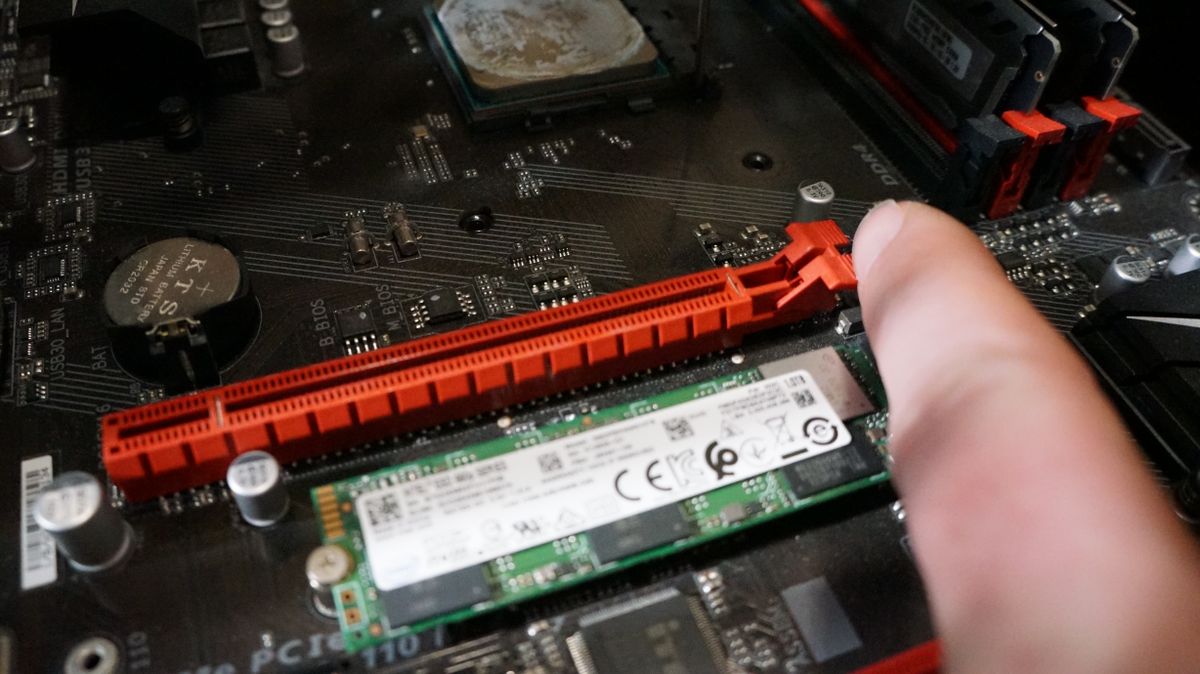
The lock or latch is quite difficult to see & photograph clearly with the GPU installed but just needs pressing down to release the GPU.
5. With the card out of the PC check the gold connectors where the card plugs into the motherboard. Check for any scratches, burrs or damage on both sides.
6. If you see anything you think looks damaged take some close up pictures of the damage and send it to us.
7. If you see any dirt or grease on the gold contacts clean it off carefully with a soft clean cloth
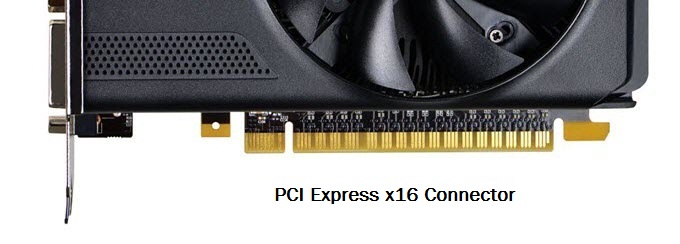
8. Also check the Motherboard slot for any damage or dirt while the card is out. Again f you see any damage take some close up pictures s and send them over to us.
9. Clean the gold contacts on the Graphics Card. Don't use alcohol or nail varnish remover like you did for the memory though. Just use a soft clean cloth.
10. Clean the Motherboard slot with a soft brush or compressed air can and blow down it to dislodge any dust or debris that may be in there.
11. Then simply reverse the process to put the card back in.
12. Seat the card back in the PCIe slot
14. Press down evenly until you feel the card settle fully into the slot.
15. The little catch should close or half close by itself as the card is inserted.
16. Close the catch fully if necessary
17. Close and screw the little metal back plate back into place
18. Plug the power connection back into the GPU
19. Plug the HDMI or DP cable back in
20. Plug the mains power back power on and and test
Occasionally after reinserting the GPU it may also be necessary to remove the Memory Ram sticks and reseat them again at this point too.
STILL NO DISPLAY OR CRASHES
Cleaning out old or corrupted drivers
1. Remove the graphics card again and insert the HDMI cable into the motherboards onboard graphics HDMI connection.
The PC should then boot up with display from the onboard graphics.
Please note you dont need to remove the GPU if you are getting display from the GPU, just move on to the DDU Steps
3. Boot into windows and download DDU cleaner from here
https://www.guru3d.com/files-details/display-driver-uninstaller-download.html
4. and choose one of the download mirrors below
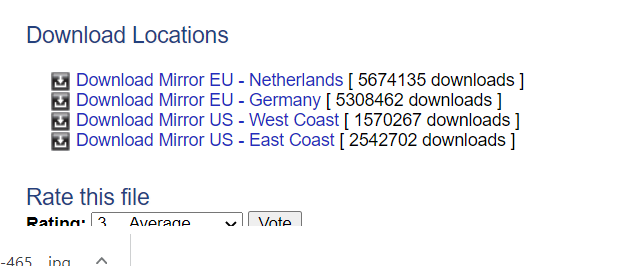
5. Locate the [Guru3D.com]-DDU.zip file in your downloads folder & unzip the folder
6. You will need an app such as 7zip, Winrar, Winzip to unzip the compressed folder
7. Once unzipped find and open the
[Guru3D.com]-DDU folder, this will be where you unzipped the file to
8. Then run DDU v18.0.3.6or DDU v18.0.3.6.exe from within the folder
9. This will unzip a further folder [Guru3D.com]-DDU\DDU v18.0.3.6
Please make a note of this location
usually it will be C:\Users\HDD-TEST\Downloads\[Guru3D.com]-DDU but this does depend where you downloaded & unzipped the file to
10. The next step is to go to Windows 10 Safe mode
11. In Safe mode please navigate the DDU folder & run Display Driver Uninstaller or Display Driver Uninstaller.exe
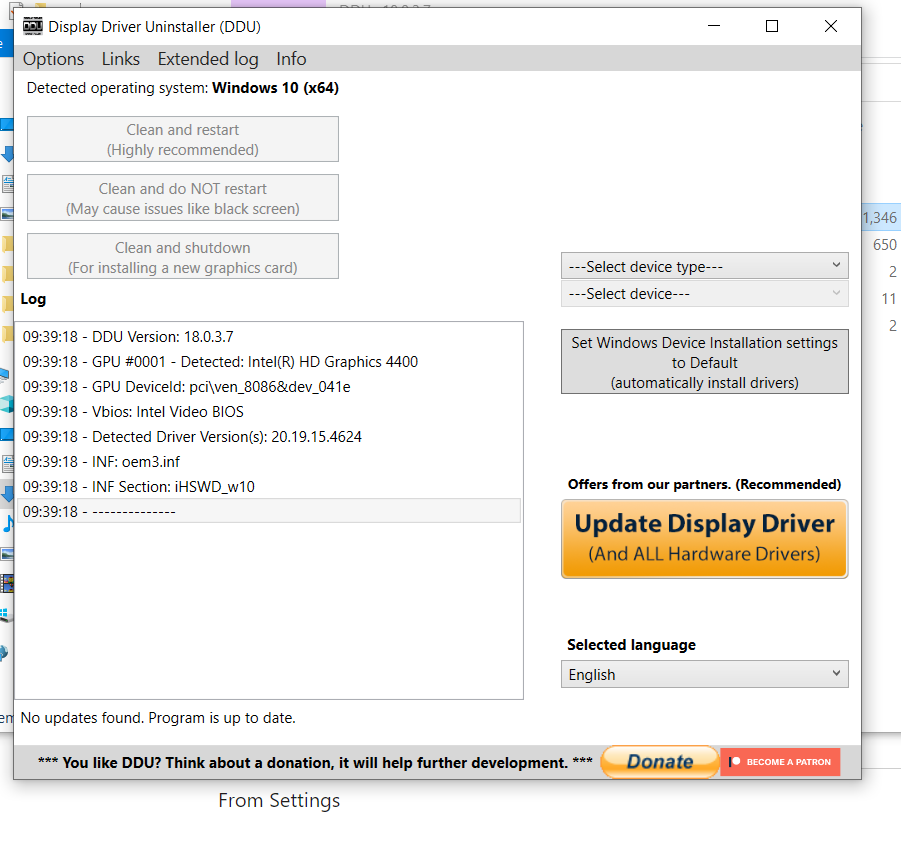
12. Select GPU & Nvidia, or AMD if your card is an AMD model
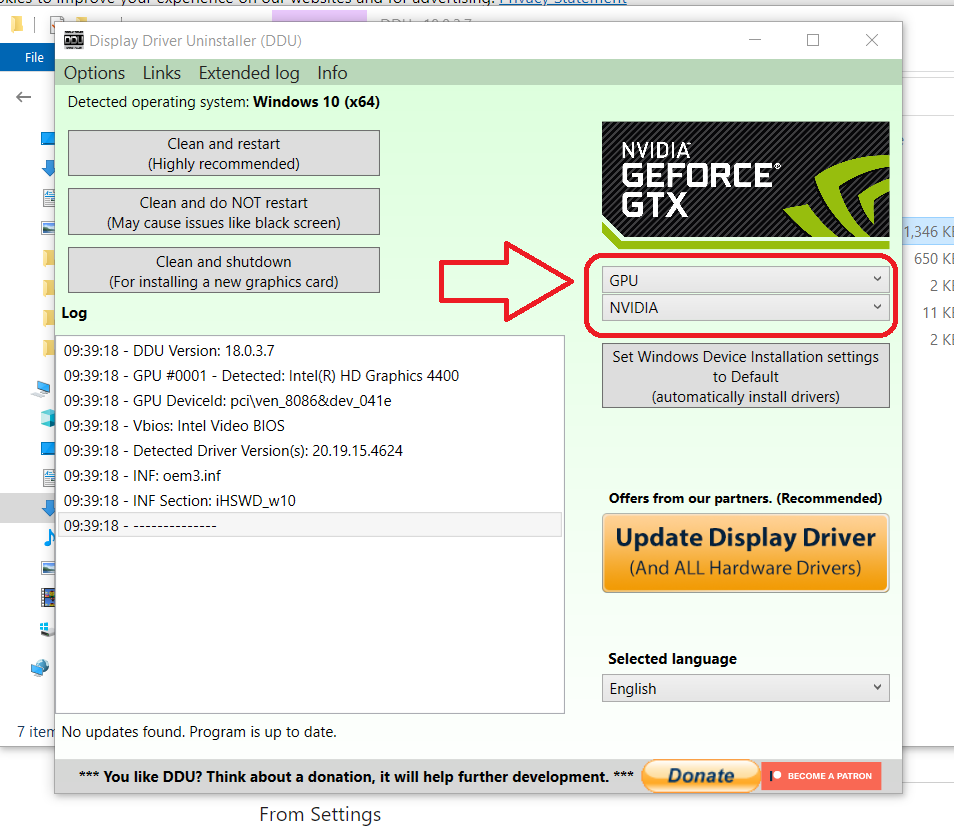
13. Choose Clean & Restart, this process will take a few minutes & your computer will then reboot into windows as normal
14. You may notice that your screen is running at a lower resolution than normal, bigger icons etc, this is because you are using Microsoft's own basic display driver temporarily
15. Power off your PC again
16. Reinsert your graphics card and put the HDMI cable back into the GPU port.
17. Reboot your PC
18. Do you get display from the Gaming card now?
19 if you are getting a display. When you load into windows, Windows 10 will install base drivers for your gaming card but you will also need to go to
Nvidia
https://www.nvidia.com/en-gb/geforce/drivers/
AMD
https://www.amd.com/en/support
To download the very latest drivers for your GPU
Check HDD Hard Drive and SSD Solid State Drive Cables
Power off the computer and unplug the power lead then remove the side panels. You will most likely have to remove the Glass and the metal panel on the other side of the PC to access both drives.
Please check inside your case and see if any of the cables pictured below have come loose. There will be 2 of these cables one for the SSD and one for your mechanical drive
Mechanical drives are usually in the bottom section of the case and are slightly larger and silver in colour

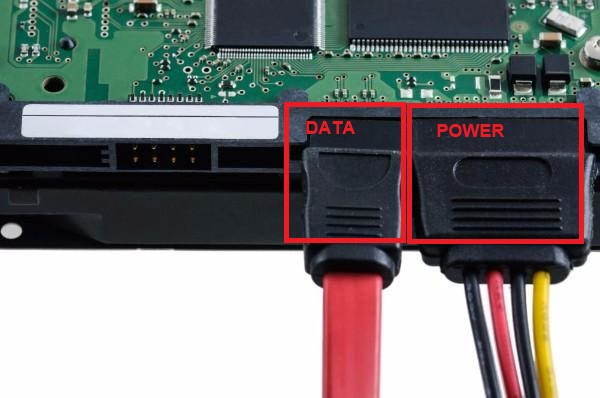
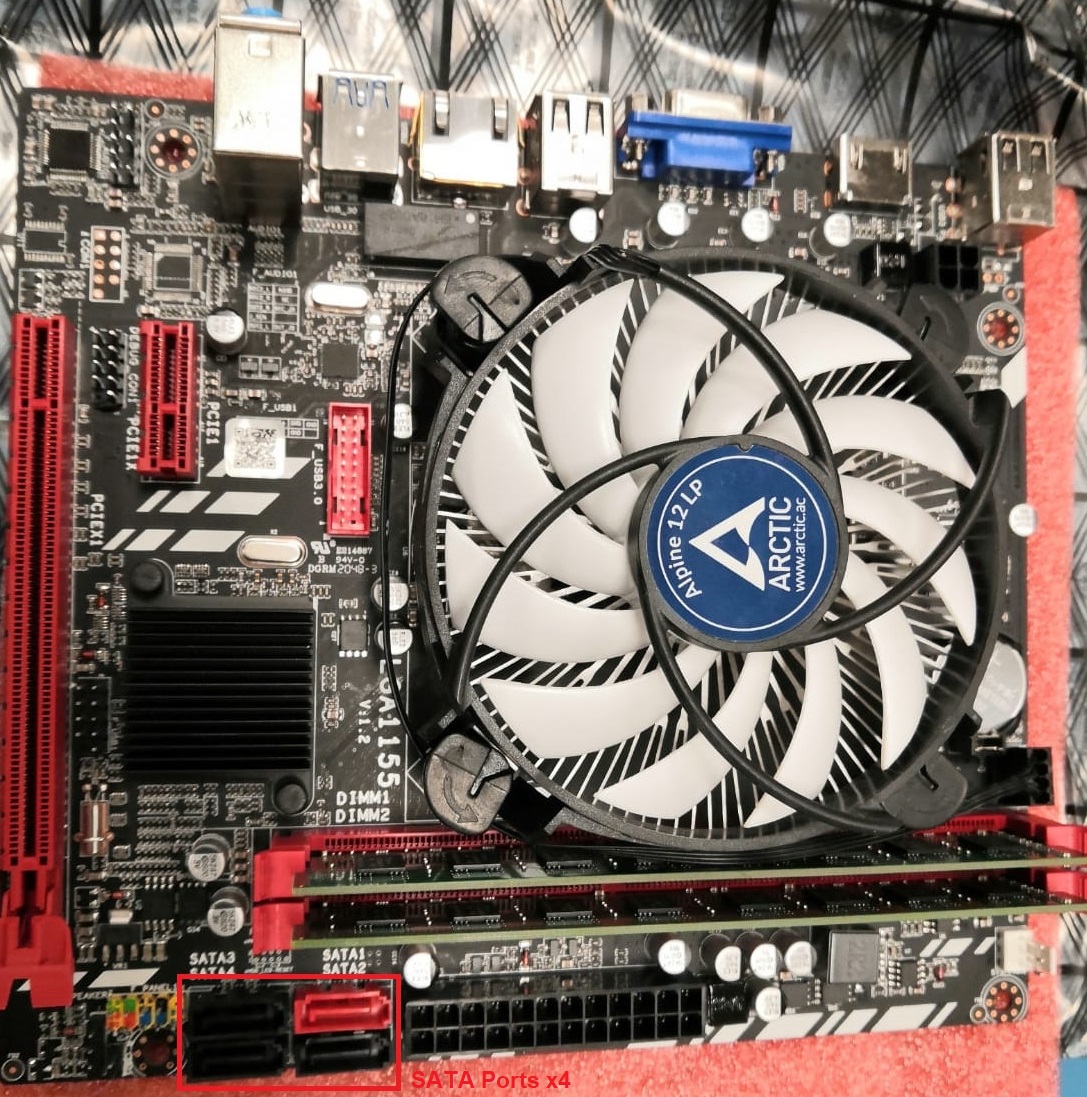
The last picture is an NVMe card which is an SSD in a different format
Please note the thinner red DATA cable in the picture are often plain black, or different colours & don't always have the metal clip
The wider POWER cable are also often just a solid black connection
You will need to check the DATA cable connections at both ends of the cable. At the drive itself and at the motherboard.
For the Power just the connection at the drive itself.
The best way to check/reseat the cables is to unplug then plug them back in.
The physically smaller drive is your SSD and that is where Windows or your Operation System is located.
And the physically larger silver coloured drive is your mechanical drive with more capacity/space
If the cable is loose on the SSD you will not be able to boot into windows
And if the cable is loose on your mechanical drive you should still be able to boot into windows but have less storage capacity then you expect.
So please make sure that both the DATA & Power cables are seated snugly & firmly into the drives & that the DATA cable is also properly seated in the Motherboard socket.
Please let us know the results of these tests
Also please can you also take some photos inside the case so we can try to identify if anything else is loose, misplaced or damaged
Can you also take individual photos of the RAM Memory modules including the Product ID stickers and send them to us
Comments
0 comments
Please sign in to leave a comment.