
If your new system appears to filling up too quickly or you notice you don't have the hard drive sizes capacity you expected when you ordered your PC. There are a couple of things to check.
So Right click on your Start Menu and choose Disk Management

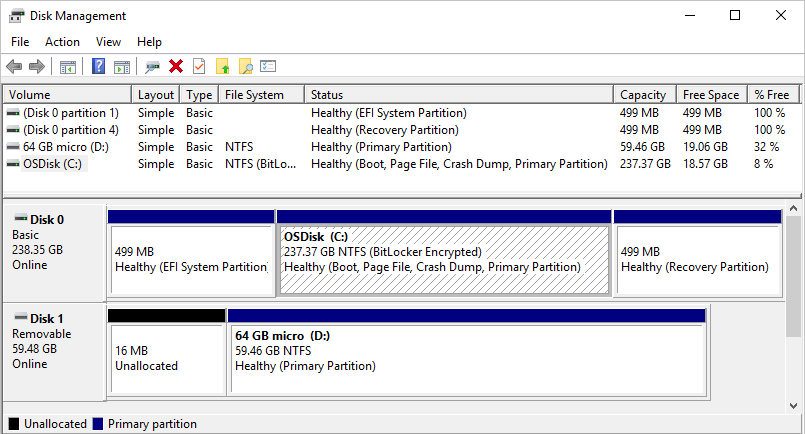
You should have Disk 0 which is your SSD & Disk 1 which is your larger storage disk
Look at disk 1 does it show as Unallocated or as Unknown/Not Initialized
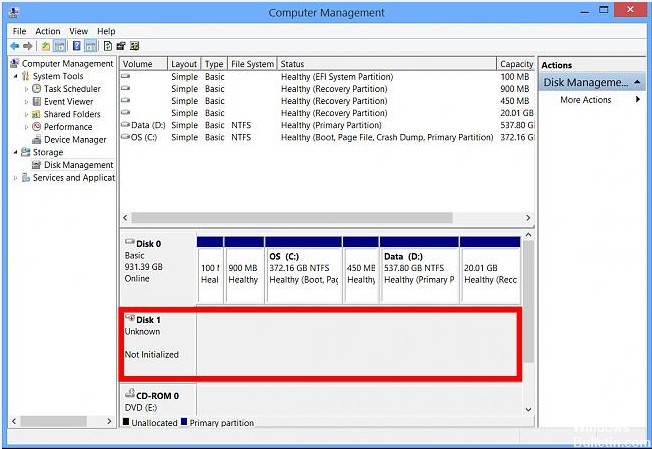
Usually the simple fix is to
Right click on the disk1 in the example above
And click initialize
Often the drive will be present and initialized already in which case all you need to do is
-
Right-click an unallocated region on your hard disk, and then select New Simple Volume.
-
In the New Simple Volume Wizard, select Next.
-
Enter the size of the volume you want to create in megabytes (MB) or accept the maximum default size, and then select Next.
-
Accept the default drive letter or choose a different drive letter to identify the partition, and then select Next.
-
In the Format Partition dialog box, do one of the following:
-
-
If you don't want to format the volume right now, select Do not format this volume, and then select Next.
-
To format the volume with the default settings, select Next.
-
-
Review your choices, and then select Finish.
You will now have an extra drive to use, usually drive D:
If the drive still shows up as Not initialized you can attempt to right click & Initialize the drive but usually if this fails it indicates that something is not plugged in properly or has failed
In which case please see below
Power off the computer and unplug the power lead then remove the side panels. You will most likely have to remove the Glass and the metal panel on the other side of the PC.
Please check inside your case and see if any of the cables pictured below have come loose. There will be 2 of these cables one for the SSD and one for your mechanical drive
Mechanical drives are usually in the bottom section of the case and are slightly larger and silver in colour


Please note the thinner red DATA cable pictured below are often plain black & doesn't always have the metal clip
The wider POWER cable are also often just solid and black
You will need to check the DATA cable connections at both ends of the cables at the drive itself and at the motherboard. And the Power power connection at the drive itself.
The best way to reseat the cables is to unplug then plug them back in.
The physically smaller drive is your SSD and that is where Windows or your Operation System is located.
And the physically larger silver coloured drive is your mechanical drive with more capacity
So if the cable is loose on the SSD you will not be able to boot into windows
And if the cable is loose on your mechanical drive you should still be able to boot into windows but have less storage capacity then you expect.
So please make sure that the DATA & Power cables are seated snugly & firmly in the drives & that the DATA cable is also nicely seated in the Motherboard sockets.
Then when you boot back into windows and Disk Management you might still see the drive as Not initialized but right clicking and Initializing the drive as MBR (Master Boot Record) should be successful.
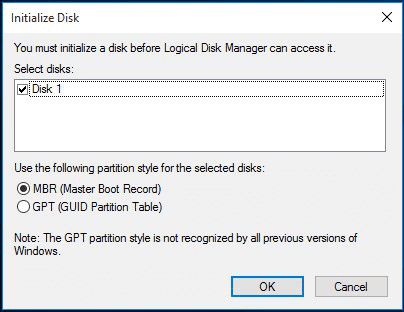
If the drive still wont initialize the problem is most likely a hardware fault, so please take some pictures inside your case and send them to us so we can try to identify if a cable or component has become loose or damaged
Also if you have a spare, known good, SATA cable please can you try swapping the cable over. If this fixes the issue please contact us and we can send you out a fresh SATA cable.
All being well you should now see your new drive but it still isn't quite ready to use
The drive still might show up as Unallocated
If it does right click inside the drive and choose New Simple Volume & follow the Wizard to create the new volume
-
Right-click an unallocated region on your hard disk, and then select New Simple Volume.
-
In the New Simple Volume Wizard, select Next.
-
Enter the size of the volume you want to create in megabytes (MB) or accept the maximum default size, and then select Next.
-
Accept the default drive letter or choose a different drive letter to identify the partition, and then select Next.
-
In the Format Partition dialog box, do one of the following:
-
-
If you don't want to format the volume right now, select Do not format this volume, and then select Next.
-
To format the volume with the default settings, select Next.
-
-
Review your choices, and then select Finish.
You will now have an extra drive to use, usually drive D:
So when you are installing large games or large applications
Choose custom installation & choose to install on your D: drive rather than the C: or system drive.
You may also want to move some of your existing games to the D: drive.
With Steam this is possible for some games, under the games properties.
With Epic games you have to uninstall & then reinstall their games.
Also see this article to check everything is plugged in and visible in the BIOS
Comments
0 comments
Please sign in to leave a comment.